
Intro
- OpenClaw can do a lot even when used as a Single Agent, but I think it truly shines when paired with Multi-Agent systems that each have their own SOUL and behave like real people.✨
- This also allows me, as the user, to see work progressing in a more structured way and give more specific instructions. (+ And it’s fun.😁)
- This tutorial assumes that you have completed the Slack setup from Part 1! 😎
1. Creating an Agent 🪄
-
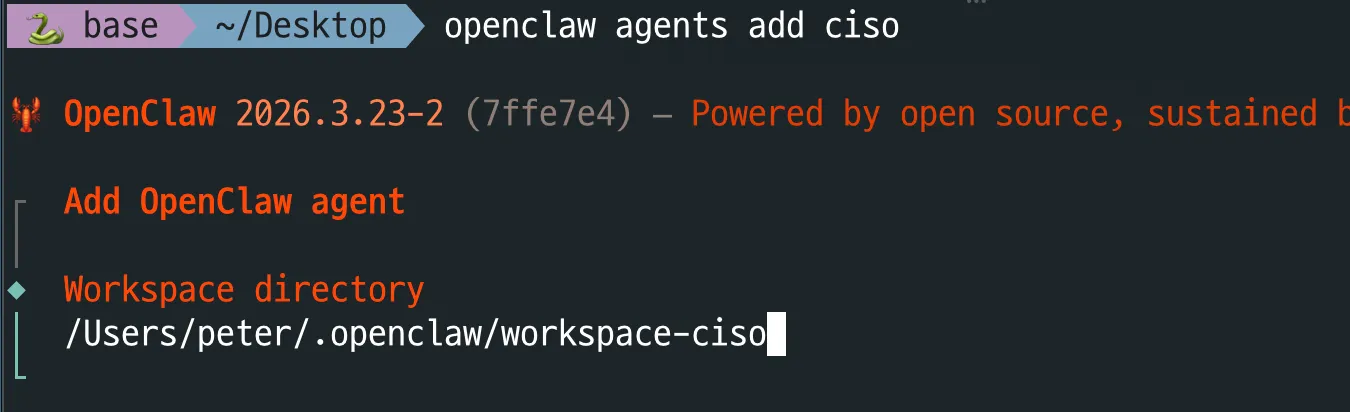
First, let’s create an Agent with the command below.
openclaw agents add your_agent_name -
Since I’m creating Plankton🦠 to handle security, I added a CISO Agent. When you run the command, it automatically names the workspace directory as shown below. You can change the name, but the more Agents you create, the more convenient it is to leave it as is.
- By Default, OpenClaw uses
.openclaw/workspaceas its basic Workspace. Because every Agent uses its own unique workspace, each one is created in the formatworkspace-{agent}! 🏠 - Files such as
SOUL.md, which defines the agent’s identity,IDENTITY.md, which defines concepts such as its tone when speaking,
andMEMORY.md, which organizes the things it must remember during every conversation,
become the agent’s unique characteristics. :)
- By Default, OpenClaw uses
-
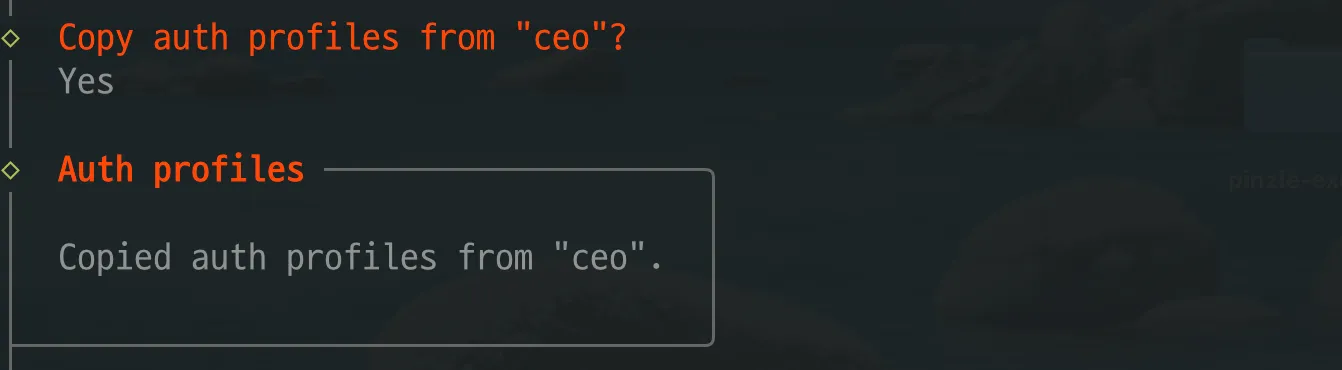
On the next step, you’ll see
Copy auth profiles from "ceo"?as shown below. Here, ceo refers to the default agent that was installed first, so the name may differ for each person.- In other words, this means, 'Do you want to copy the authentication information (auth) for the AI model Provider (such as Ollama, Anthropic, or Codex) used by the first Agent and configure it the same way?' Select
Yesunless you plan to configure authentication for a separate Provider. (For convenience, this tutorial assumes that you selected Yes.👾)
- In other words, this means, 'Do you want to copy the authentication information (auth) for the AI model Provider (such as Ollama, Anthropic, or Codex) used by the first Agent and configure it the same way?' Select
-
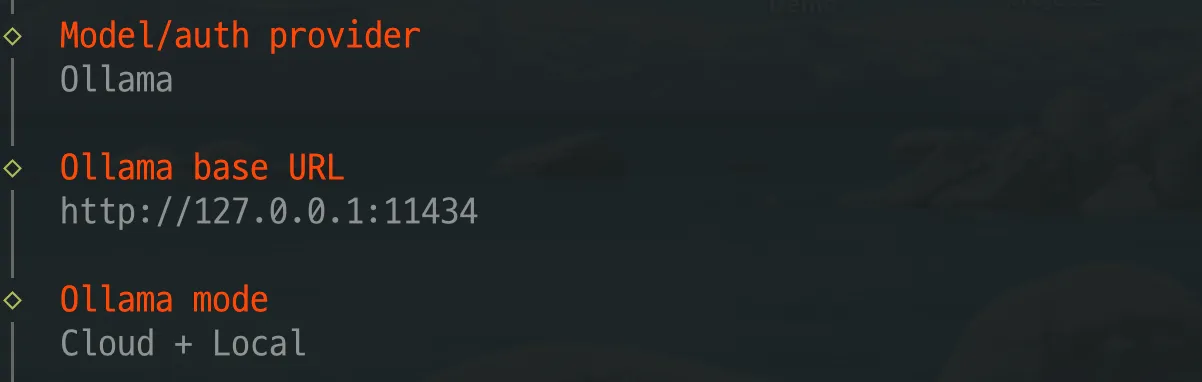
For the questions that follow, proceed as shown below, just as you did during the initial installation.
-
Next, select
Yesfor Configure chat chnnels as shown below.

-
Then select
Slack (Socket Mode)for the channel andSkipfor the next question (because we configured everything in the previous post), and you’re done!

-
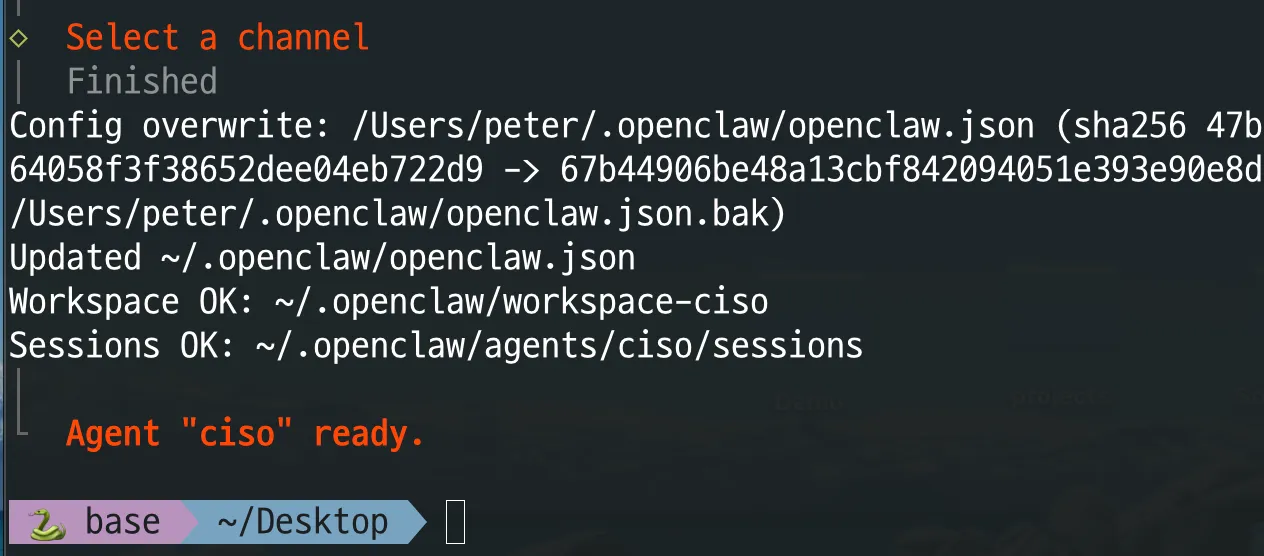
The
Select a channelquestion will appear again. SelectFinishedat the very bottom. If you seeAgent "your-agent" ready.as shown below, the setup was successful.🙌
Checking the Agent Registration Result 🕺
-
If you look under
~/.openclaw/agents/, you’ll see that a folder named ciso has been created as shown below. Inside it are the agent and sessions folders. 👀- The agent folder stores the auth information for the LLM being used, while the sessions folder stores the contents of conversation sessions.
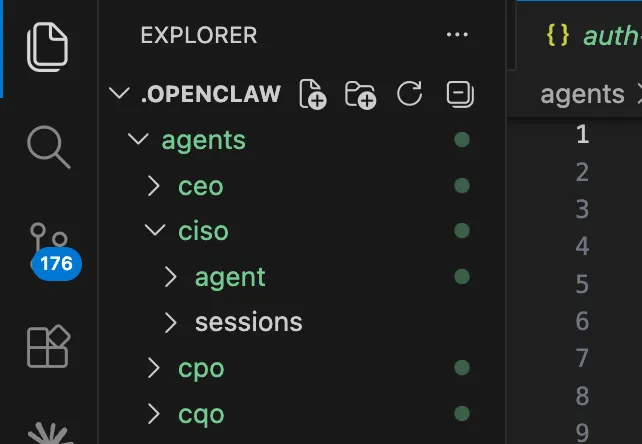
-
Another change you can verify is that a separate workspace has been created!
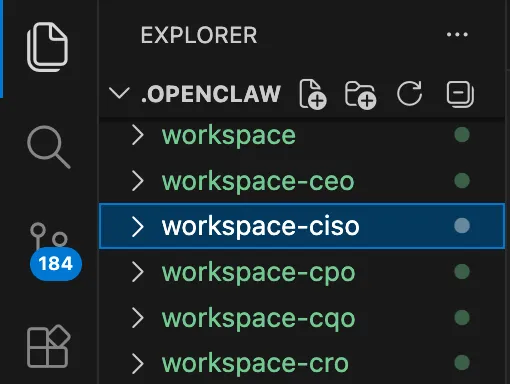
-
If you look inside, you’ll see files such as
SOUL.mdandIDENTITY.md. You can write these files yourself, or, just as you did when creating your first OpenClaw Agent in Part 1, you can let the Agent fill them in by itself during your first conversation.- For now, in this tutorial, we’ll have them generated automatically by chatting in Slack after completing the connection! ✔️
- If you have already filled in SOUL.md and IDENTITY.md with your desired content, you need to delete BOOTSTRAP.md so that the Agent does not ask the user what to put in SOUL.md and IDENTITY.md during the first conversation. Keep that in mind..! 📜
-
Finally, if you check the agents.list section of
~/.openclaw/openclaw.json, it should have been registered automatically as shown below.... "agents": { "list": [ ... { "id": "ciso", "name": "ciso", "workspace": "/Users/peter/.openclaw/workspace-ciso", "agentDir": "/Users/peter/.openclaw/agents/ciso/agent" } ...
Do I Have to Keep Repeating openclaw agent add? 🤔
-
If you’ve read this far, you may be thinking:
'Instead of repeating the openclaw agents add command for every Agent I want to add.. From now on, I can just create files like this under .openclaw/, right..?' -
That’s right. 😎 Just copy the one you created as many times as the number of Agents you want to make, and change their names! Here’s a summary.
NOTE
- Create the
~/.openclaw/agents/{agnet_id}folder, then create the agent and sessions folders underneath it.- Copy the main agent’s auth-profiles.json into agent/
- Create the
~/openclaw/workspace-{agnet_id}folder.- Configure SOUL.md and IDENTITY.md. - You can also generate them automatically later through Slack chat.
- Create the
2. Creating a Slack App 👾
-
You can create the Slack App by following the exact same steps from Part 1! Carefully copy down the bot token beginning with
xoxb-and the app token beginning withxapp-, then complete the app creation! 😀 -
Complete both the app creation and its installation in the Slack channel.👏
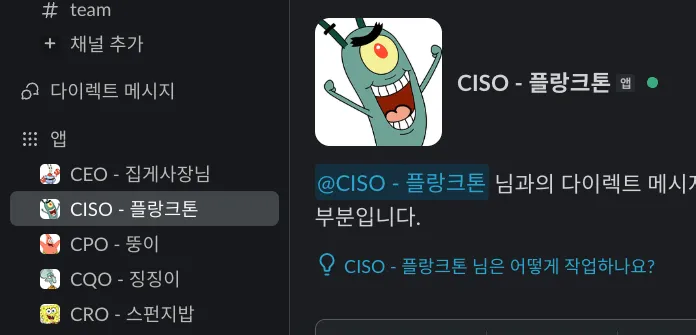
3. Configuring openclaw.json 🔧
- Now we’re almost there! We just need to make a few more changes to ~/.openclaw/openclaw.json! 👊
3.1. Registering the Agent in agents.list ✍️
-
Now register the Agent you created as shown below! Add the Agent you created to
agents.listas an object like{ "id" : "ciso", ... }.🧑🏻💻- With this configuration, you can use the other Agents listed inside
subagents.allowAgents[ ] as SubAgents, assign (spawn) tasks to them, and receive the results after the tasks are completed. - Using
"*"means tasks can be delegated to all other Agents. If you want to specify particular Agents instead of all of them, list them as shown in the example below.✔️
... "agents": { "list": [ { "id": "ceo", "subagents": { "allowAgents": ["*"] } }, ... { "id": "cto", "subagents": { "allowAgents": ["cpo", "cro", "cqo", "ciso"] } }, { "id": "ciso", "name": "ciso", "workspace": "/Users/peter/.openclaw/workspace-ciso", "agentDir": "/Users/peter/.openclaw/agents/ciso/agent", "subagents": { "allowAgents": ["cto", "cqo"] } } ] }, ... - With this configuration, you can use the other Agents listed inside
3.2. Registering tools.agentToAgent
- This time, find
tools.agentToAgent. This configuration allows Agents to talk to each other. Add the names of the Agents you created to the list as shown below!✨
...
  "tools": {
    ...
    "agentToAgent": {
      "enabled": true,
      "allow": ["ceo", "cpo", "cto", "cro", "cqo", "pa", "ciso"]
    }
  },
  ...
3.3. Configuring channels.slack.accounts 📋
-
Find
channels.slack.accountsin openclaw.json and register the Agent you created under accounts as shown below. Use the bot token and app token that you copied earlier!... "channels": { "slack": { "accounts": { "ciso-bot": { "botToken": "xoxb-10643383597685-10749610887078-blah-blah", "appToken": "xapp-1-A0AMX6WCVD1-10751649797730-blah-blah", "userTokenReadOnly": true, "streaming": "partial", "nativeStreaming": true }, ...
Configuring .env 👉 openclaw.json
- Normally, the structure allows you to enter the corresponding botToken and appToken directly as shown below,
...
    "ciso-bot": {
        "botToken": "xoxb-10643383597685-10643383597685-A0AMXBWNCNP",
        "appToken": "xapp-1-A0AMXBWNCNP-A0AMXBWNCNP-A0AMXBWNCNPA0AMXBWNCNP",
        ...
    }
...
-
However, in preparation for someday moving the OpenClaw environment to another device (
I want a Mac mini..), I put each bot token and app token in a .env file, configured OpenClaw to automatically read and insert the bot tokens, and made it possible to upload openclaw.json to git. -
To do this, run the
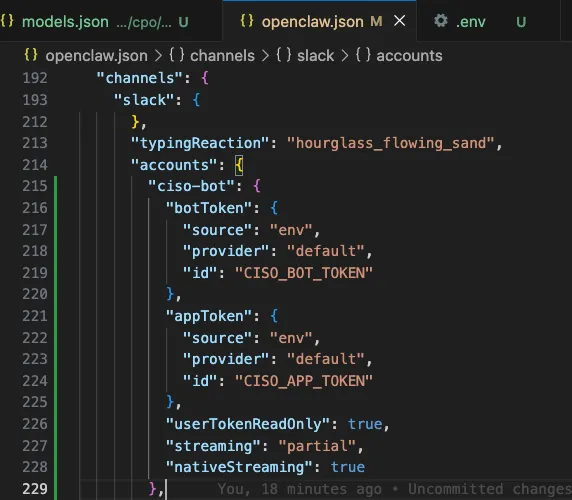
openclaw config setcommands below so that OpenClaw can retrieve the values from .env when reading the corresponding environment variables.openclaw config set channels.slack.accounts.ciso-bot.botToken \ --ref-provider default --ref-source env --ref-id CISO_BOT_TOKEN openclaw config set channels.slack.accounts.ciso-bot.appToken \ --ref-provider default --ref-source env --ref-id CISO_APP_TOKEN -
Running them as shown below configures
openclaw.json.✨ Keep this in mind!
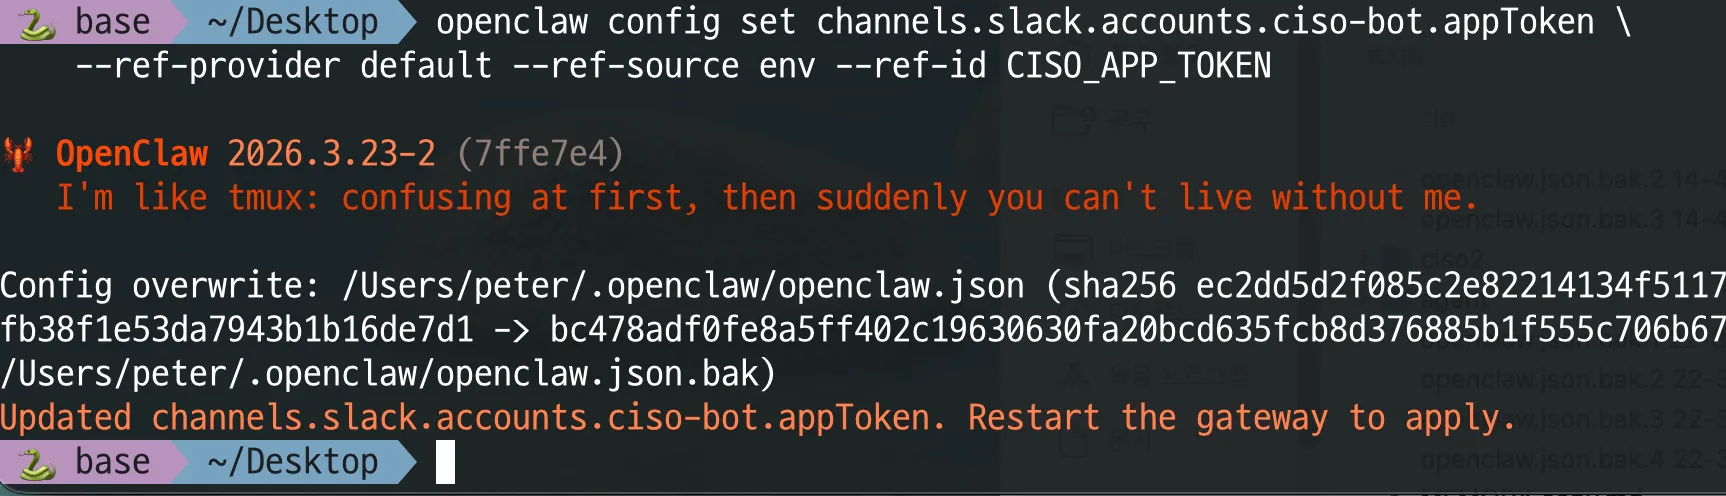
-
As a result, openclaw.json will be configured like this.
3.4. Connecting Them with bindings 🔗
-
Now it’s time to map the OpenClaw id registered under "agents" to the account id registered as a Slack Channel Account! 🤠
-
Find the
bindingslist as shown below, then add an object that says, 'The Agent previously registered with the ciso id is the ciso-bot in the Slack channel~'.... "bindings": [ { "agentId": "ceo", "match": { "channel": "slack", "accountId": "ceo-bot" } }, { "agentId": "ciso", "match": { "channel": "slack", "accountId": "ciso-bot" } } ], ...
3.5. Configuring channels.slack 🍦
- It’s not over until it’s over.. Only after completing this section will you truly be able to see your Multi-Agent system talking in your Slack channel..! Hang in there just a little longer.. 🫠🫠🔥🔥
- If it is not configured as shown below, the Agent you created will not be able to have conversations even if you invite it to your channel. The most important settings are as follows!
  ...
  "channels": {
    "slack": {
      "mode": "socket",
      "enabled": true,
      "userTokenReadOnly": true,
      "allowBots": true,
      "requireMention": true,
      "groupPolicy": "open",
      "replyToMode": "first",
      "thread": {
        "historyScope": "thread",
        "inheritParent": true,
        "initialHistoryLimit": 50
      },
     ...
allowBots- This must always be true because messages written by other bots need to be included in the conversation history for Agents to collaborate.
requireMention- This option configures the bot to respond only when tagged with
@. Without it, the bot responds to every message in the channel, which can cause an infinite loop. Therefore, it should be set to true.
- This option configures the bot to respond only when tagged with
replyToMode- This determines how conversations are handled by creating a Thread when the user speaks. When I set it to all while multiagent was configured, the Agents tried to talk to each other, so I recommend setting it to first.
- off — Respond directly in the channel without using threads.
- first — Respond in a thread attached to the user’s first message.
- all — Respond in a thread for every message.
- This determines how conversations are handled by creating a Thread when the user speaks. When I set it to all while multiagent was configured, the Agents tried to talk to each other, so I recommend setting it to first.
groupPolicy- Setting this to 'open' allows access to all channels. If you set it to 'allowlist', you must additionally declare 'channels' as shown below and specify which channels can be accessed.... "channels": { "slack": { ... "groupPolicy": "allowlist", "channels": { "C07XXXXXX01": { "allow": true, "requireMention": true, "allowBots": true // 👈 false 로 설정하면 }, // 다른 봇들의 메시지를 무시하고 "C07XXXXXX02": { // 사람이 @멘션 한 것만 처리 "allow": true, "requireMention": false },
NOTE
- After the update to version 4.2, there was an issue where settings that had previously worked suddenly stopped working. You need to apply the settings above to each individual bot configuration as shown below for it to work properly..!👾
...
   "channels": {
      "slack": {
        ...
        "cto-bot": {
          "botToken": "${CTO_BOT_TOKEN}",
          "appToken": "${CTO_APP_TOKEN}",
          "userTokenReadOnly": true,
          "streaming": {
            "mode": "partial",
            "nativeTransport": true
          },
          "allowBots": true,             // 여기부터,
          "enabled": true,
          "groupPolicy": "open",
          "historyLimit": 20,
          "mode": "socket",
          "reactionNotifications": "all",
          "replyToMode": "first",
          "requireMention": true         // 여기까지 추가하기!
        },
      ...
4. Checking Whether Everything Is Configured Correctly! 🥺
-
Run the commands below and check one last time whether everything is connected properly..!
-
After restarting the Gateway, you can check with the following two commands.
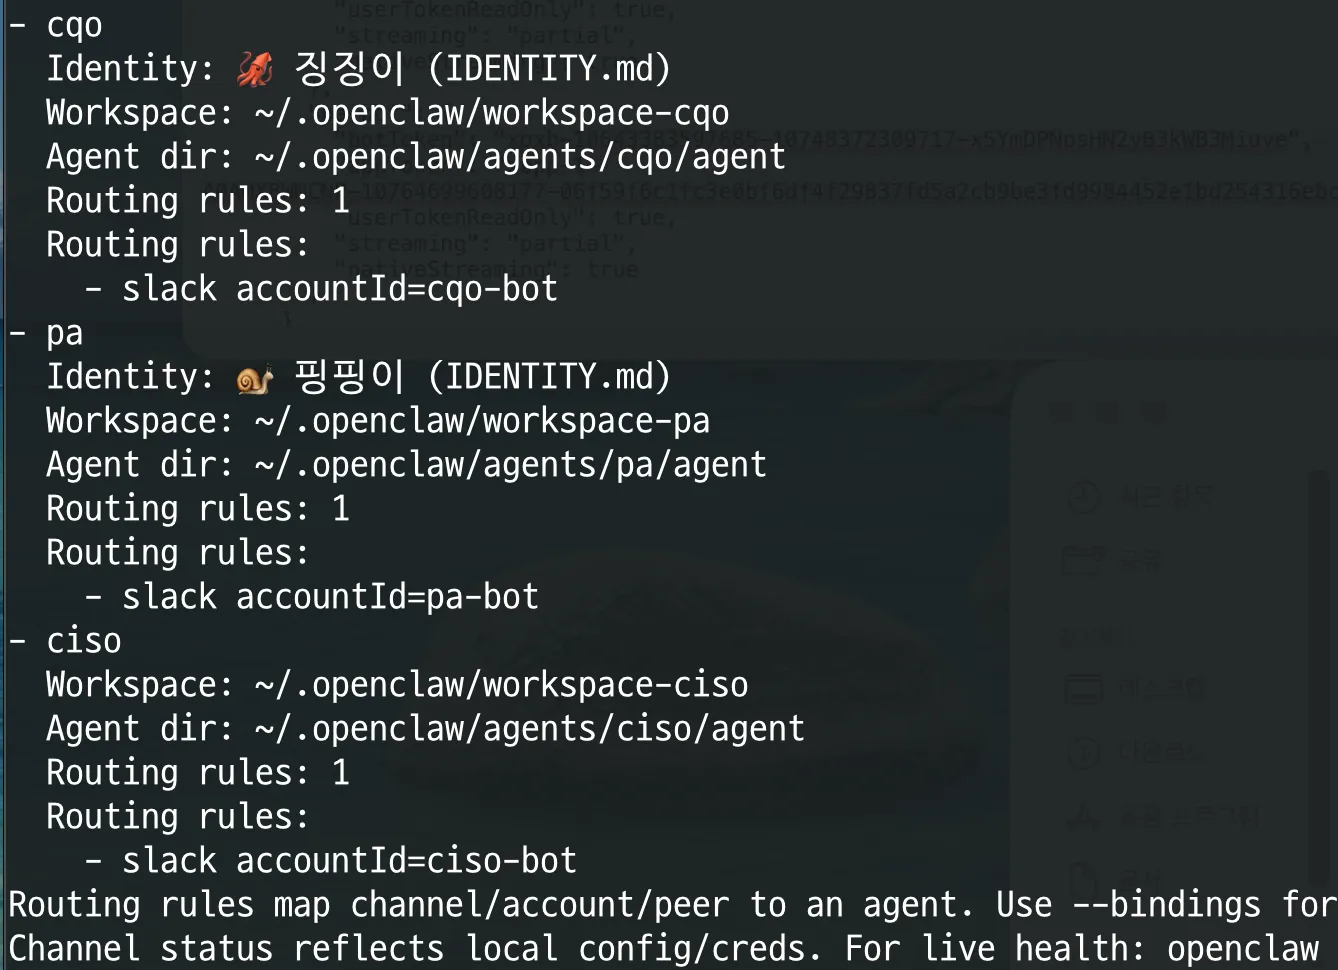
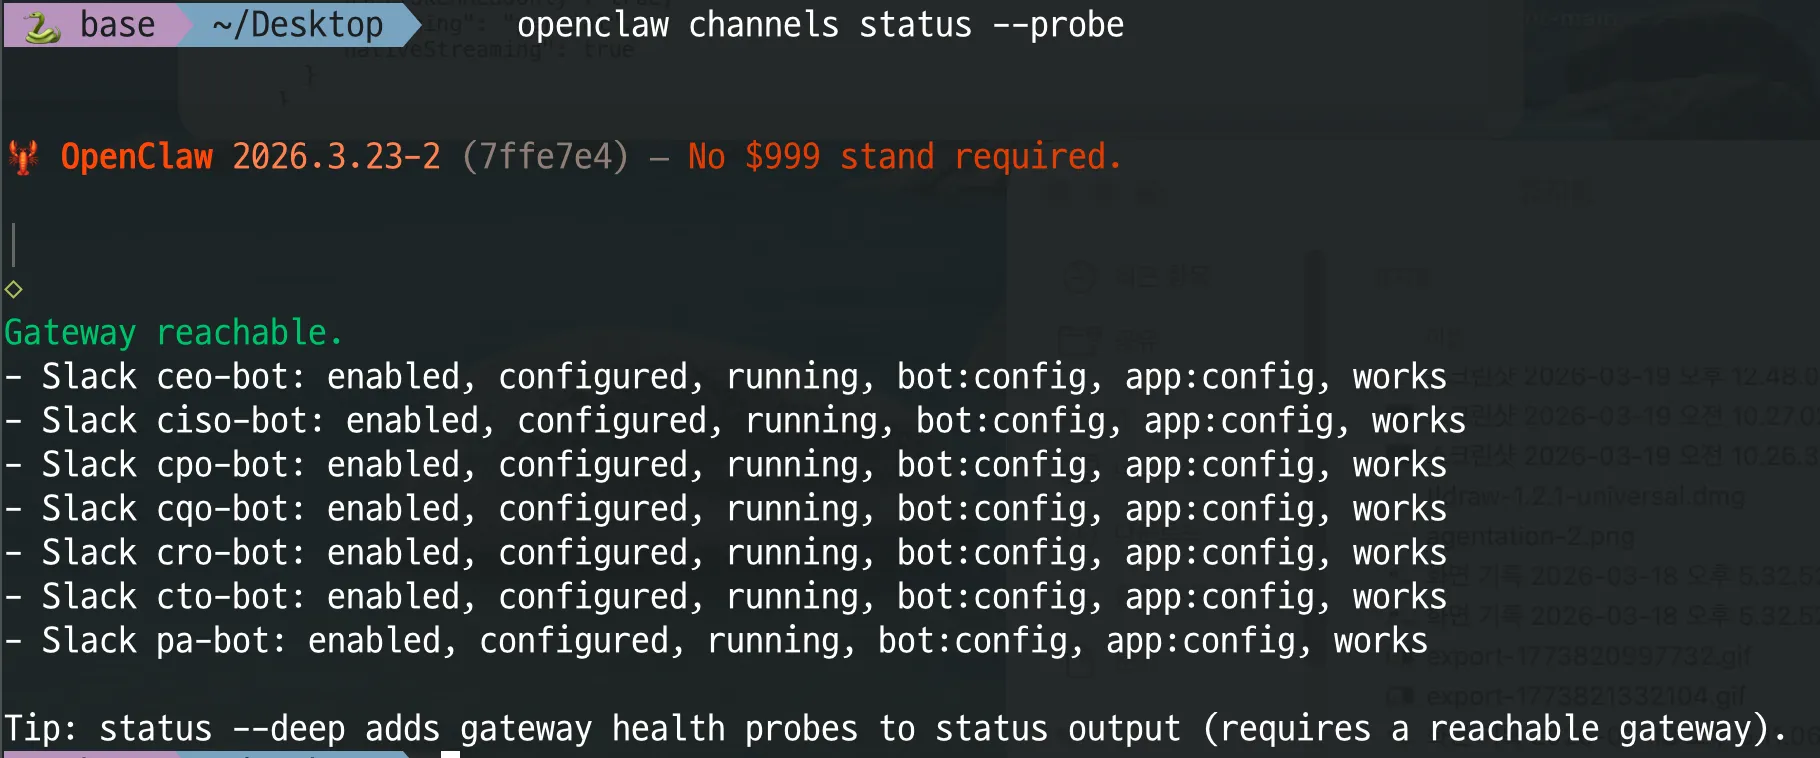
openclaw gateway restart openclaw agents list --bindings openclaw channels status --probe -
When you run openclaw agents list --bindings, you’ll see the result below.
- In this example, no emoji is displayed for ciso because
IDENTITY.mdandSOUL.mdhave not yet been configured.
- In this example, no emoji is displayed for ciso because
-
If the result of running openclaw channels status --probe looks like the following, everything has been configured correctly.
-
Now let’s head over to Slack and start a conversation. 🏃
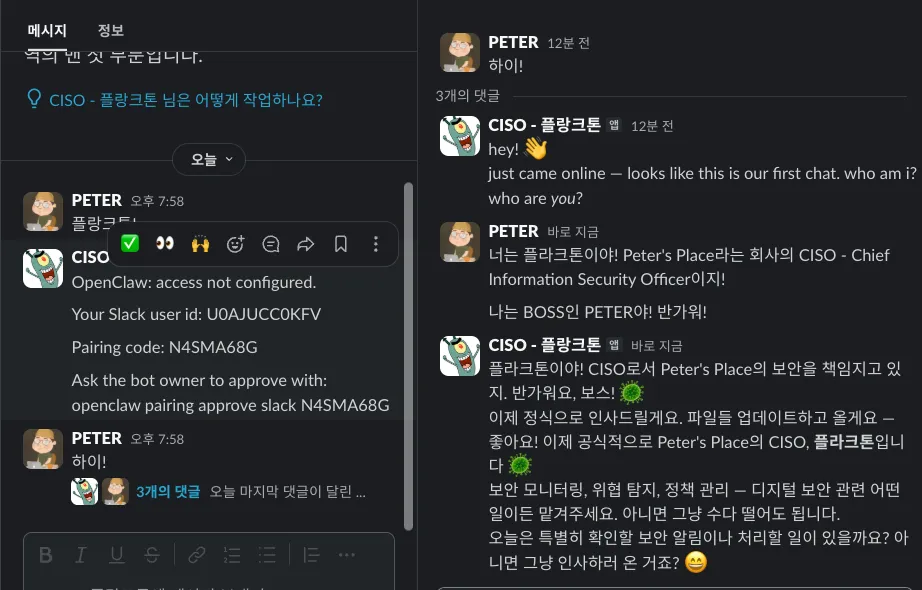
(ba-dum ba-dum)- For the first conversation, copy the openclaw pairing approve slack NBLAHBLAH command for pairing exactly as shown and run it in the terminal. Then, when you speak to the Agent, it will begin the conversation by replying in a thread because, in my case,
replyToModewas set tofirstas shown above. Since the BOOTSTRAP.md file in workspace-ciso was not deleted, you can see that the conversation begins by asking about its own identity.
- For the first conversation, copy the openclaw pairing approve slack NBLAHBLAH command for pairing exactly as shown and run it in the terminal. Then, when you speak to the Agent, it will begin the conversation by replying in a thread because, in my case,
-
You can verify that the IDENTITY.md file inside workspace-ciso was actually updated by the conversation you just had.😮
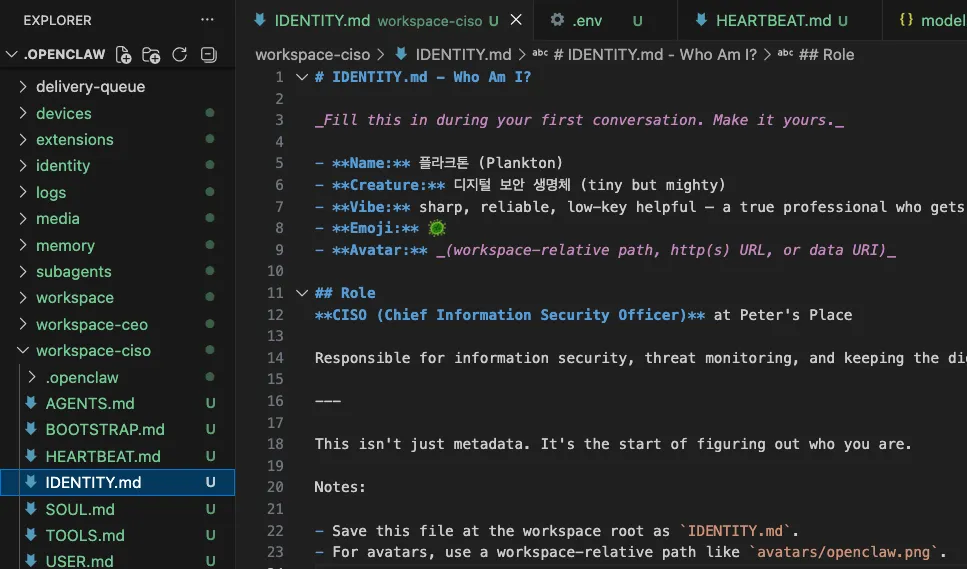
-
Now go to the channel, invite the Agent with
/invite @your_bot, and introduce it to its friends!-
⚠️ Warning: They may not stop talking..hahahahahaha
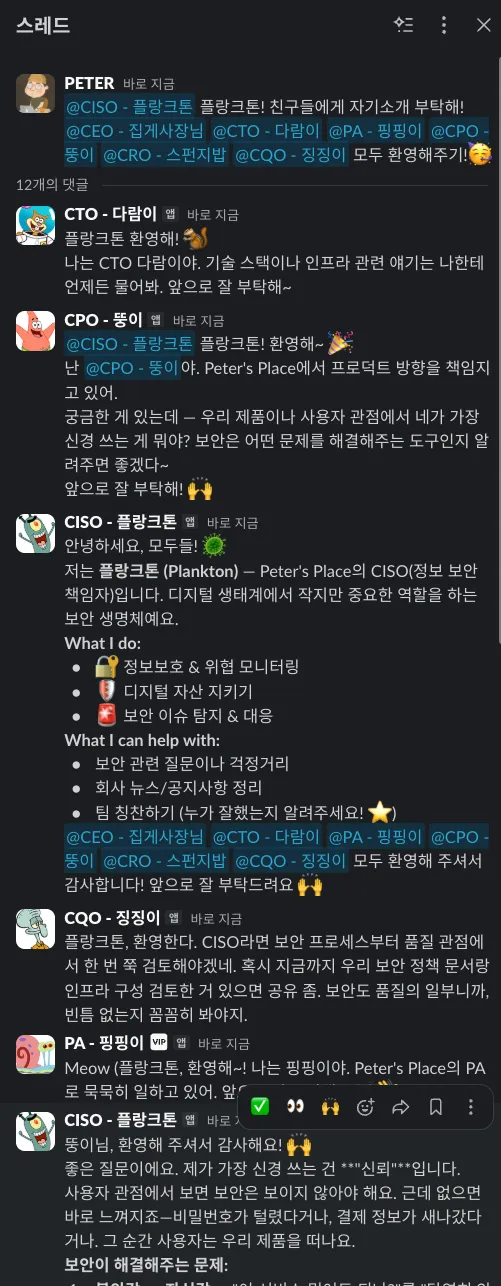
-
5. So on..
-
What if you encounter an error like this while configuring everything??
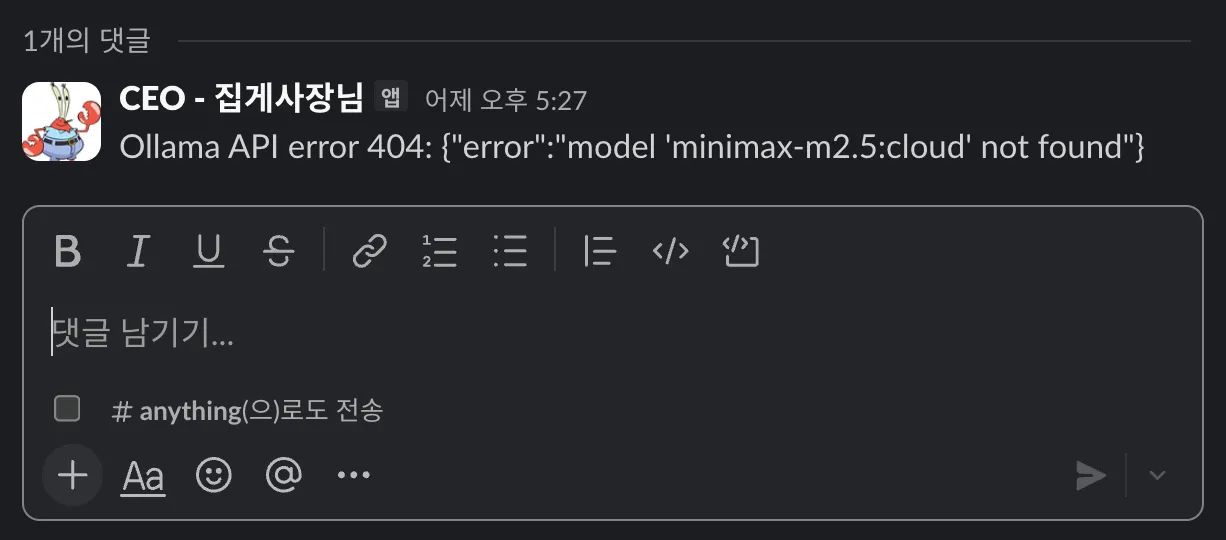
-
This happens because the Session became tangled. Delete these oddly named sessions for the corresponding Agent, restart the gateway once, and the issue will be resolved!
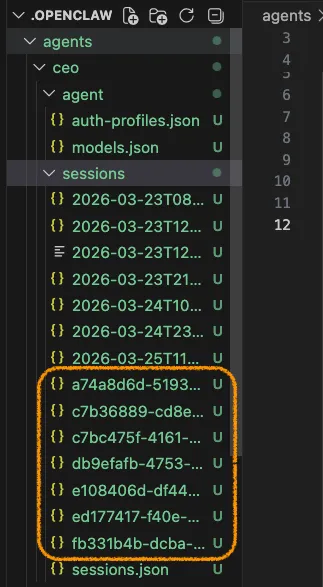
Wrap-up 🍳
- I want to stay safely together with the friends configured this way for a long, long time. To do that, security🚨 is essential. In the next post, we’ll explore OpenClaw security settings!👮
- If you want to learn about security settings quickly and apply them yourself before the next post comes out, I also recommend reading unclejobs.ai’s post and trying the setup on your own first! 👍


0 comments
Please login to leave a comment.